路由系统
路由过度效果
如果默认的路由动画不好看,你可以在src/layouts/components/AppRouterView.vue里修改。
注意
虽然 vue3 已经支持了多个根组件,但是在启用了路由过度动画后,路由组件不能使用多个根组件,否则页面切换的时候白屏,即使是文本、注释也不可以, 也就是说template的第一个子元素必须是有效的 html 元素、组件。
正确示例:
<template>
  <div></div>
</template>错误示例:
存在多个根标签:
<template>
  <div></div>
  <div></div>
</template>注释也不行:
<template>
  <div></div>
  <!-- 我是注释 -->
</template>自动生成路由
rengar-admin的路由是基于src/views目录自动生成路由文件,无需手动配置, 自动生成的路由文件在src/router/routes.ts中,自动生成的类型化路由文件位于typings/app/vite-plugin-routes.d.ts中。
自动生成路由的 vite 插件位于packages/vite-plugin-vue-routes
提示
在生成的路由文件中,手动修改 meta 的配置、redirect配置不会被自动覆盖,其他的均会被自动覆盖。
生成规则
- 路由的
path根据文件夹来命名。 - 叶子节点必须存在
index.vue或者[xxx].vue的文件,否则会被忽略,不会生成路由。 - 路由的
name为祖先的目录命名,以-连接。 - 路由的
meta的title为祖先的目录命名,以_连接。 - 以
[xxx].vue的文件,会被认为是动态路由,生成路由时,会自动生成params参数,如[id].vue会生成/:id
注意
由于系统自带了默认的演示页面,在清理无关的路由页面时候,src/views的 404、home 、login文件目录不能删除,其他的目录可以删除。
单层路由
假设src/views目录下有如下目录结构:
src
└── views
    ├── dashboard
│ └── index.vue则会自动生成如下路由:
[
  {
    path: "/dashboard",
    name: "dashboard",
    meta: {
      title: 'dashboard'
    }
    component: () => import("@/views/dashboard/index.vue"),
  }
];多级路由
假设src/views目录下有如下目录结构:
src
└── views
    ├── dashboard
    │   ├── index.vue
    │   └── analysis
    │       └── index.vue
    ├── user
    │   └── list
    │       └── index.vue
    │   └── add
    │       └── [index].vue
    │   └── edit
│ └── [id].vue # 动态路由则会自动生成如下路由:
[
  {
    path: "/dashboard",
    name: "dashboard",
    meta: {
      title: 'dashboard'
    }
    component: () => import("@/views/dashboard/index.vue"),
    children: [
      {
        path: "/dashboard/analysis",
        name: "dashboard-analysis",
        meta: {
          title: 'dashboard_analysis'
        }
        component: () => import("@/views/dashboard/analysis/index.vue"),
      }
    ]
  },
  {
    path: "/user",
    name: "user",
    meta: {
      title: 'user'
    }
    children: [
      {
        path: "list",
        name: "user-list",
        meta: {
          title: 'user_list'
        }
        component: () => import("@/views/user/list/index.vue"),
      },
      {
        path: "add",
        name: "user-add",
        meta: {
          title: 'user_add'
        }
        component: () => import("@/views/user/add/index.vue"),
      },
      {
        path: "edit/:id",  # 动态路由
        name: "user-edit",
        meta: {
          title: 'user_edit'
        },
        component: () => import("@/views/user/edit/[id].vue"),
      }
    ]
  }
]meta 配置
| 属性 | 类型 | 默认值 | 说明 |
|---|---|---|---|
| title | string | 自动生成 | 路由的标题,会被用于生成面包屑和菜单的名称 |
| layout | "base"或"blank" | base | 页面的布局,默认为 base |
| roles | string 或 string[] | - | 权限设置 |
| icon | string | - | 菜单的图标,直接使用"iconify"的图标名 |
| localIcon | string | - | 菜单的本地图标 |
| keepAlive | boolean | - | 页面是否缓存 |
| hideInMenu | boolean | - | 是否在菜单中隐藏 |
| hideInTab | boolean | - | 是否在 tab 栏中隐藏 |
| activeMenu | string | - | 当此页面被激活时,高亮显示的菜单的 name |
| constant | boolean | - | 是否是常量路由,设置了该选项后,不需要登录、不需要鉴权就能访问 |
| order | number | - | 排序 |
| href | string | - | 设置了会外部跳转该链接 |
| fixedInTab | boolean | - | 是否固定在 tab 栏中 |
| showBack | boolean | - | 是否显示返回按钮,若为 true 则在 tab 栏左侧显示,tab 隐藏该选项无效 |
| multipleTab | boolean | - | 同一个 name 的路由是否多开,适用于详情之类的页面 |
keep-alive
得益于vue-router的新特性,实现多级keep-alive非常简单, 要想实现页面kee-alive缓存,需要做如下配置:
- 路由的
meta中设置keepAlive: true - 当前路由的祖先路由中不允许出现
component字段。
如:
{
    path: "/user",
    name: "user",
    meta: {
      title: 'user'
    }, # 这里没有component字段
    children: [
      {
        path: "list",
        name: "user-list",
        meta: {
          title: 'user_list',
          keepAlive: true
        }
        component: () => import("@/views/user/list/index.vue"),
      },
    ]
}原理: rengar-admin会在构建的时候会在.vue文件自动注入defineOptions({name: 'xxx'}),xxx为当前路由的name。也就是说,在开发中手动设置路由组件的name是无效的。该自动注入插件位于packages/vite-plugin-vue-inject-name中。
路由跳转
之前版本为了路由跳转能获得类型提示,rengar-admin封装了自定义 hooks,位于src/hooks/router.ts中,但是最新版本不需要了。
自v2.1.0开始,路由插件会自动生成类型化路由,直接使用 useRouter()即可获得类型提示。
提示
使用useRoute()获取路由参数params,可以手动手动加上泛型,泛型就是路由的 name,如:
const route = useRoute<"detail">(); // 会校验传的name是否存在
route.params.id; // 有类型提示增加额外参数
自2.5.0开始,支持额外的参数,代码位于src/router/config.ts中:
只需在对应name的路由下定义参数即可,下面展示了使用自定义的菜单图标和自定义路由守卫的例子:
import type { Component } from "vue";
import type { RouteRecordRaw } from "vue-router";

import HomeIcon from "~icons/mingcute/home-2-line";
import SettingIcon from "~icons/mingcute/settings-5-line";

interface ExtraConfig {
  meta: {
    icon: Component;
  };
}

export type ExtrarouteConfig = Partial<
  Record<
    RouteRecordName,
    ExtraConfig &
      Omit<
        RouteRecordRaw,
        | "name"
        | "path"
        | "redirect"
        | "meta"
        | "children"
        | "component"
        | "meta"
      >
  >
>;

export const extraRoutesConfig: ExtrarouteConfig = {
  home: {
    meta: {
      icon: HomeIcon,
    },
    beforeEnter() {
      console.log("router guard");
      return true;
    },
  },
  setting: {
    meta: {
      icon: SettingIcon,
    },
  },
};一个基本的路由示例
常见的列表、新增、编辑的示例。
目录结构:
src
└── views
    ├── user
    │   └── list
    │       └── index.vue
    │   └── add
    │       └── index.vue
    │   └── edit
│ └── [id].vue路由:
[
  {
    path: "/user",
    name: "user",
    meta: {
      title: '用户管理'
    },
    redirect: '/user/list',
    children: [
      {
        path: "list",
        name: "user-list",
        meta: {
          title: '用户列表',
          hideInMenu: true,
          activeMenu: 'user'
        }
        component: () => import("@/views/user/list/index.vue"),
      },
      {
        path: "add",
        name: "user-add",
        meta: {
          title: '新增用户',
          hideInMenu: true,
          activeMenu: 'user'
        }
        component: () => import("@/views/user/add/index.vue"),
      },
      {
        path: "edit/:id",  # 动态路由
        name: "user-edit",
        meta: {
          title: '编辑用户',
          hideInMenu: true,
          activeMenu: 'user'
        },
        component: () => import("@/views/user/edit/[id].vue"),
      }
    ]
  }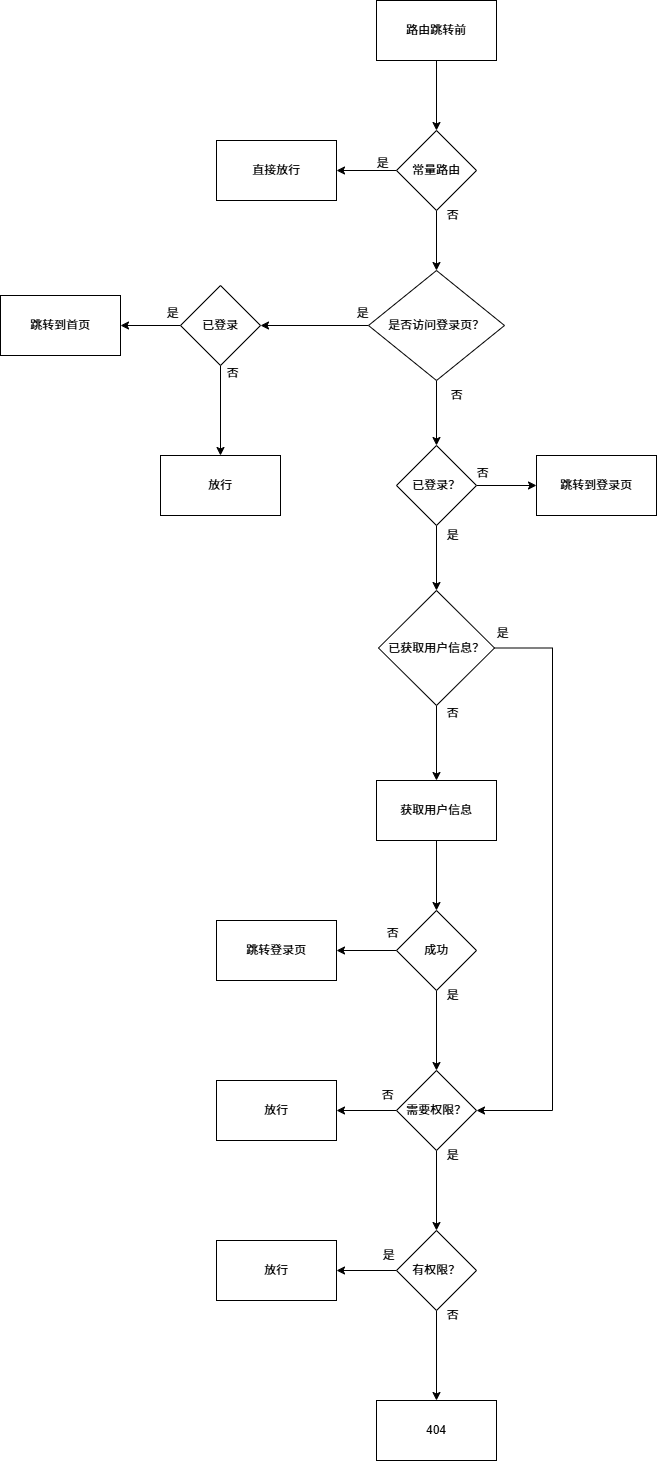
]全局路由守卫流程图
全局路由守卫代码位于src/router/guard.ts中。
去除自动生成路由
如果不需要自动生成路由,在build/plugins/index.ts移除路由插件:
export function setupVitePlugins() {
  const plugins: PluginOption[] = [
    setupInject(),
    vue(),
    vueJsx(),
    vueDevTools(),
    setupRouter(),
    setupUnocssPlugin(),
    ...setupAutoImportPlugin(),
    setupVersion(),
  ];
  return plugins;
}就可以去src/router/routes.ts中手动配置路由了。
注意
即使你去除了路由插件,你手动定义的路由还是得遵循系统的规范,如果要继续使用 keep-alive 功能,那么你的路由配置中的 name 必须遵循与插件自动生成的规则一致(即:路由的 name 为祖先的目录命名,以-连接,如:user-list)。